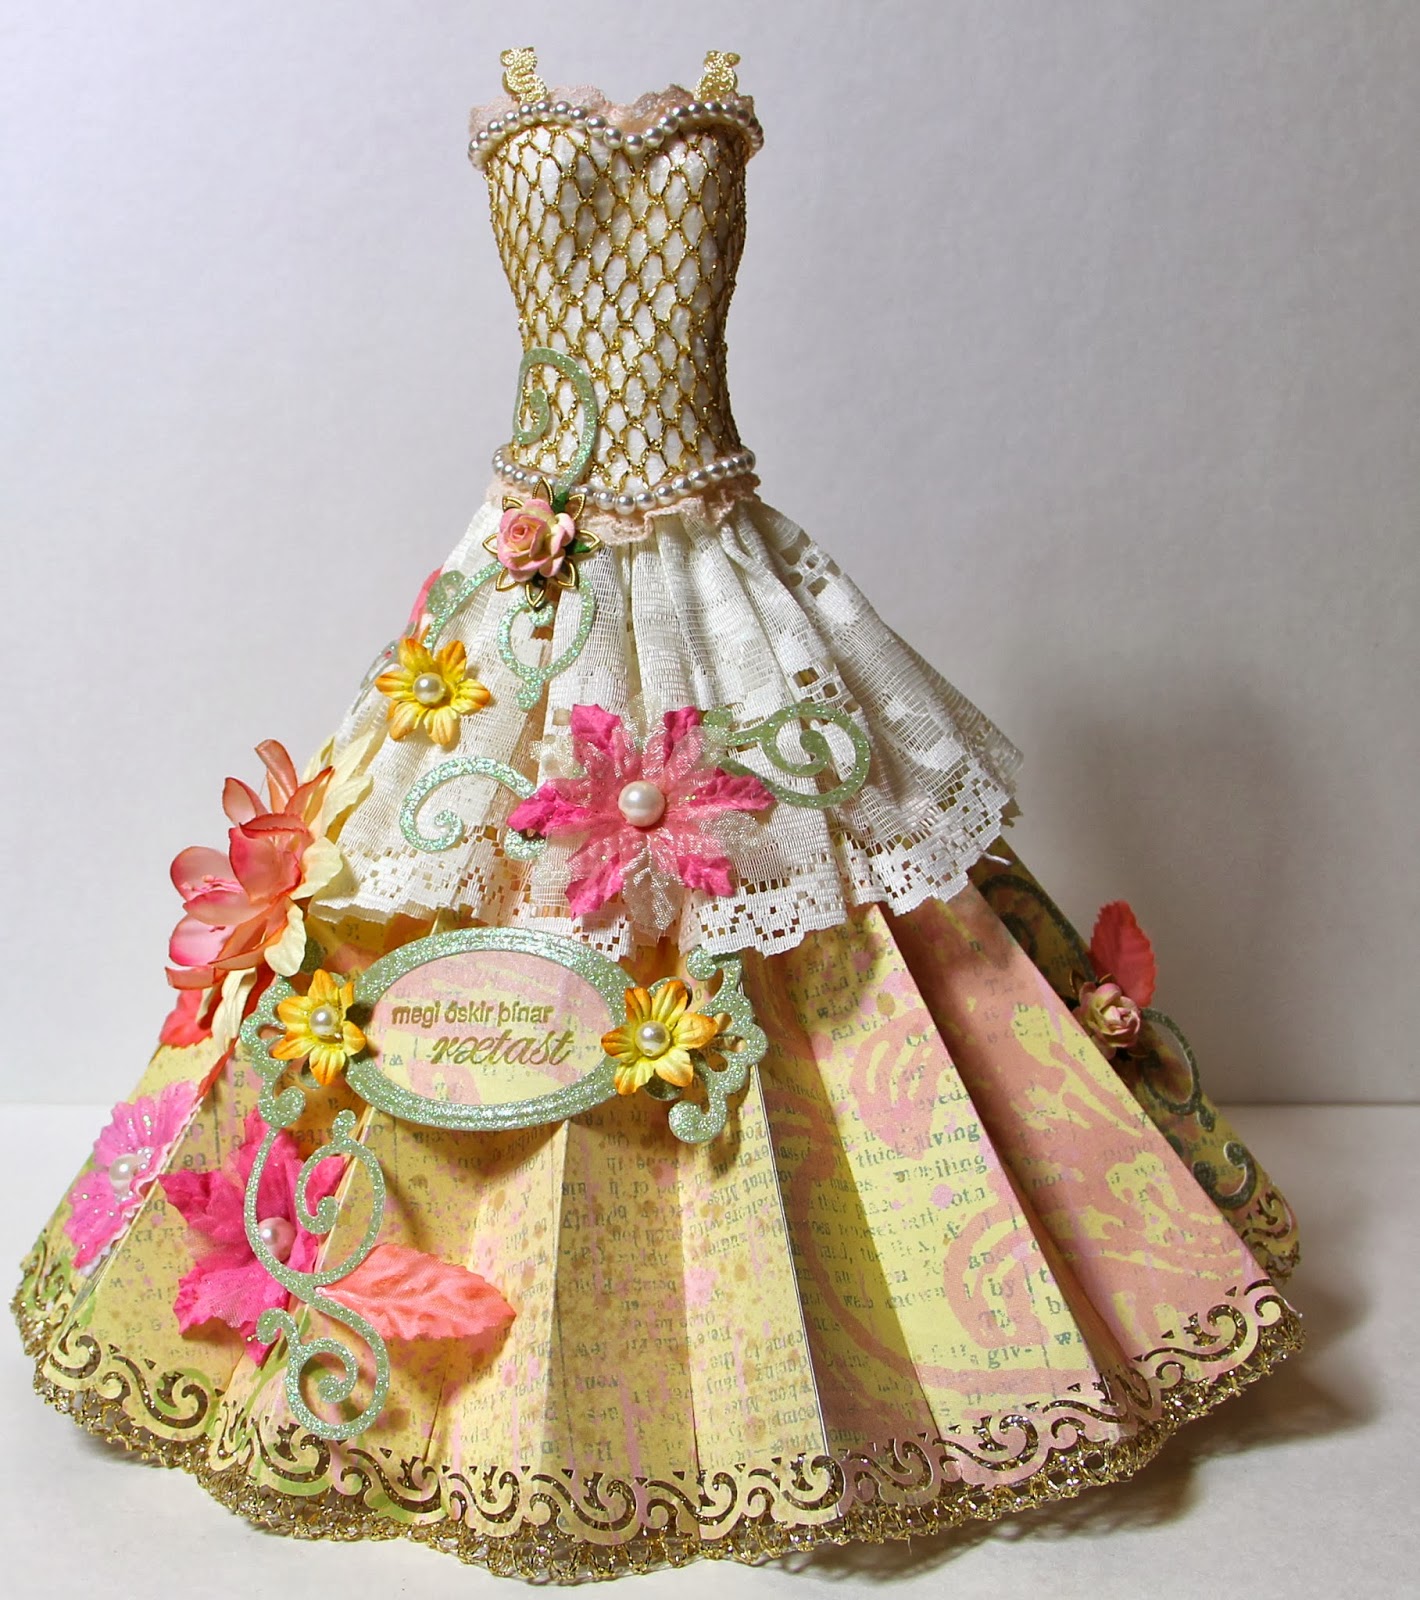
“MEGI ÓSKIR ÞÍNAR RÆTAST”Blómakjóll
“MAY YOUR WISHES COME TRUE”
Flowerdress
Hugmyndina af þessu fékk ég þegar ég sá eitthvað svipað í YouTube einhverntíman.
I got this idea from YouTube tape I saw some time ago.


Notið búk af dúkku (t.d. Barbie) og vefjið efri hlutann með plastfilmu. Rífið niður pappírsræmur, ekki klippa því þá koma skarpir kantar.
Use the body from a doll and wrap the upper part with a plastic film. Tear down some paper, don't cut it because then the edges will be sharp.

Berið Mod Podge á plastfilmuna og leggið pappírsræmurnar á. Berið svo meira Mod Podge á pappírinn og haldið þessu áfram þar til komið er jafn þykkt lag af “pappírsmassa” á búkinn. Látið þorna.
Apply some Mod Podge on the plastic film and put the paper shreds on it. Then apply some more Mod Podge on the paper and continue doing this until you have an equally thick layer of "papier maché" on the body. Let it dry.
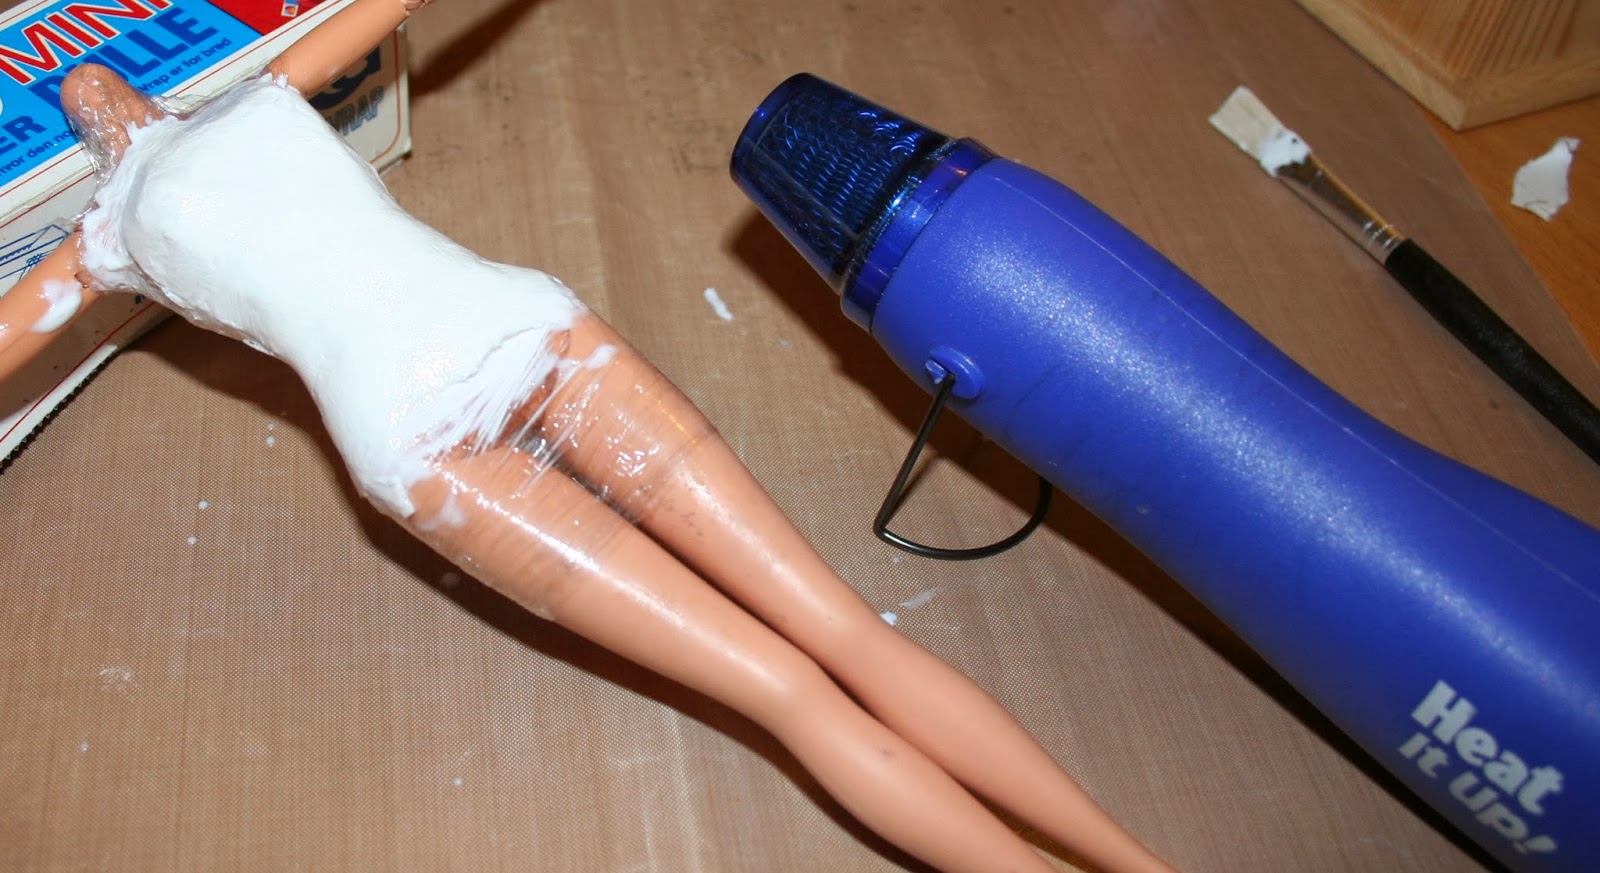
Ágætt er að flýta fyrir þornun með því að nota hitabyssu.
A good way to quicken the drying is using a heat gun.


Næst er skrautneti vafið utanum búkinn, með samskeytin aftaná.
Next you wrap a decorative net around the body, with the joints in the back.


Berið Mod Podge á allt netið og látið þorna.
Apply Mod Podge to the entire net and let it dry.


Klippið “pappírsmassan” utanaf búkum fyrir miðju aftaná (á milli netkantanna) Fjarlægið plastið.
Cut the "papier maché" off the body in the middle of the back( between the net borders). Remove the plastic.


Klippið til og límið niður kantana á netinu ef þarf.
Cut and glue down the borders on the net if needed.


Þegar búið er að forma (klippa til) stykkið eru hlírarnir límdir á og svo blúnda að ofna og neðan, límt innaná.
Once you've shaped the piece the straps are glued on and lace is glued on the inside at the top and the bottom.


Gatið næst fyrir kósa og setjið þá í.Þræðið borða í. (Sjá mynd neðar) Þá er efri partur kjólsins tilbúinn.
Next make holes for the eyelets and put them in. Thread a ribbon through the eyelets (see picture below). Now the upper part of the dress is finished.


Límið saman tvö 12”x12” blöð með límbandi og teiknið eins stóran hálfan hring og blaðið leifir. Teiknið annan lítinn næst miðju. Brjótið pappírinn saman og klippið út.
Glue together two 12x12 papers with tape and draw as large a half-circle as the paper allows. Draw another small one in the middle. Fold the paper and cut out.


Brjótið nú hálfhringinn í harmonikku. Best er að gera það með því að brjóta alltaf til helminga þangað til maður er kominn með þá breidd af brotum sem maður vill hafa.
Now fold the half-circle into a harmonica. The best way is to always fold into half until you've got the breadth that you want to use.


Búið til munsturkannt með gatara á neðri brún pilsins.Límið samanbrotið net á bakhlið pilsins afranvið og niðurfyrir munsturkantinn.
Make a stylished border with a border punch on the bottom of the skirt. Glue a net which is folded in half on the back of the skirt and below the border edge.

Límið saman breiða blúndu eins og pils og límið saman harmonikkupilsið. Blúndupilsið er því næst límt innaná efri parinn (bolinn) og svo er harmonikkupilsið límt inn á sama stað undir blúndunni.
Glue together a large lace to make it look like a skirt. Glue the harmonica-skirt together. The lace-skirt is then glued onto the inner part of the upper part (the body) and then the harmonica-skirt is glued onto the same spot under the lace.


Þá er komið að skreytingu á kjólnum.
Límið perluband á bolinn, bæði að ofan og neðan. Skreytið kjólinn með swirl , blómum, laufi, perlum og að lokum með heillaóskatextanum “ Megi óskir þínar rætast”Allt skrautið er límt á . Laufblöðin eru kölkuð á köntunum og ofaná og perlur límdar í miðjuna á blómunum.
Now its time for the decorations on the dress.
Glue a string of pearls onto the body, both the upper and the lower. Decorate the dress with a swirl, flowers, leaves, pearls and finally the saying "May your wishes come true".All the decorations are glued on. The leaves edges are chalked and the the pearls glued in the middle of the flowers.


Ef einhvern langar að vita eitthvað meira í sambandi við þetta, vinsamlegast spyrjið hér og ég svara hér.
Vá, ekkert smá flott hjá þér!
ReplyDeleteKv, Anna
Takk takk, Anna :)
Deleteæði.
ReplyDeleteTakk Steina :)
DeleteÞetta er alveg meiriháttar fallegt hjá þér. Góðar leiðbeiningar!!
ReplyDeleteTakk Erla mín :)
DeleteWOW Jona!!! This is simply Stunning and very very creative!!! I love the step by step pictures. This is amazing :-)
ReplyDeletehugs, Steff
Thank you so much Steff for this lovely comments,
DeleteHugs, Jóna <3
Stunning my friend! Love it! Wish that I could get some time to try it myself, but for now I just have time to admire your work. Tons of hugs, Anki
ReplyDeleteWow so nice!
ReplyDelete